November 6, 2013
Saving a Tin Ceiling
We’ve been working with Amherst College on the renovation and addition to 79 South Pleasant in Amherst, MA. The building was built in the 1830s and was originally home to the First Baptist Church. KRA’s Andy Grogan looks back on how the project team saved the sanctuary’s c. 1905 tin ceiling.
Faced with a historic building that had been less-than thoughtfully renovated by a previous owner in the 1960s, we didn’t expect much of the original interior to remain. The sanctuary’s 12’ high windows had been removed and replaced with pairs of double-hungs when a third floor was inserted into the sanctuary; the arch that stood behind the pulpit had been hacked away to make room for a staircase; and there were few traces of any original woodwork. The prospect of integrating historic fabric into the new spaces wasn’t looking good.
Long before its 1960s conversion into retail and office space, the church was renovated by its congregation around 1900. At that time, the congregation aspired to a grand renovation (designed by the New York architect Elliot Lynch), but they ended up with more modest alterations, including a revamped sanctuary that featured a high-relief tin ceiling.
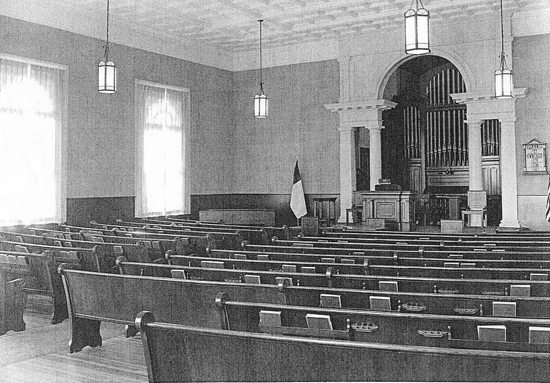
 As we started work on the project, we were aware of the tin ceiling from old photos (above), and workers had glimpsed small sections of it above an acoustical panel ceiling that had been installed in the 1960s when a third floor was added within the original double-height sanctuary (left).
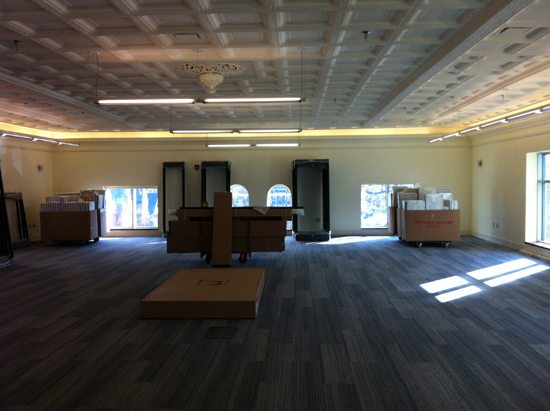
While demolition of the interior was underway, it quickly became clear that the majority of the tin still existed and could be saved. Once the entire ceiling was visible, the team felt that its deep coffers, dropped beams, and cast-iron center medallion could become a striking part of the new open-plan workspace.
It would be a challenge, though: some panels had been damaged beyond repair or were missing entirely; others were riddled with nail holes; and there were noticeable sags in more than one location across the ceiling.
Upon closer review, the reason for the dips in the ceiling became clearer: layers of furring, plaster, lathe, and blocking were sandwiched between the tin ceiling and the attic joists above. Some of the old nails had pulled loose, and many plaster keys had broken years before. In some spots, we could see the original plaster ceiling with its trompe l’oeil detailing (below, left); in other spots, the plaster was gone entirely.
 Working with our structural engineer, Jim Norden of GNCB, the team devised a strategy to secure the ceiling and stabilize the assembly. In the attic, additional blocking was installed between joists to accept long screws that would tie the many layers back together (see detail below). Hundreds of fasteners later, the ceiling is secure and those large sags are gone.
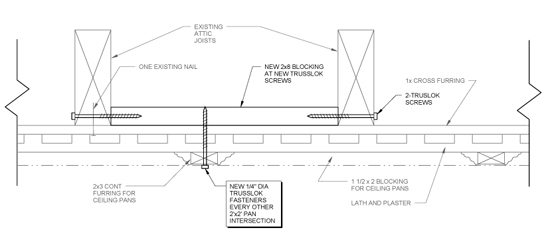
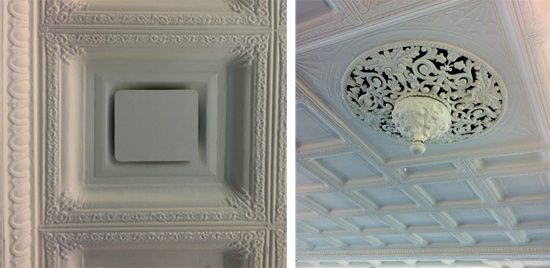
Once the ceiling was stablized, the contractor, Aquadro & Cerruti, was able to salvage panels from the western end of the room (where closets and attic access stairs were being built) to patch the missing panels. The ceiling was painted and then prepped for lighting, ductwork penetrations, and sprinkler drops. New ductwork registers were carefully integrated within the panels to minimize their visibility (below, left), and our MEP engineer, BVH Integrated Services, suggested making the central cast-iron medallion into a functioning part of the HVAC system by using it as a return-air plenum (below, right).
With final lighting adjustments and furniture delivery underway, the space is almost complete (below).